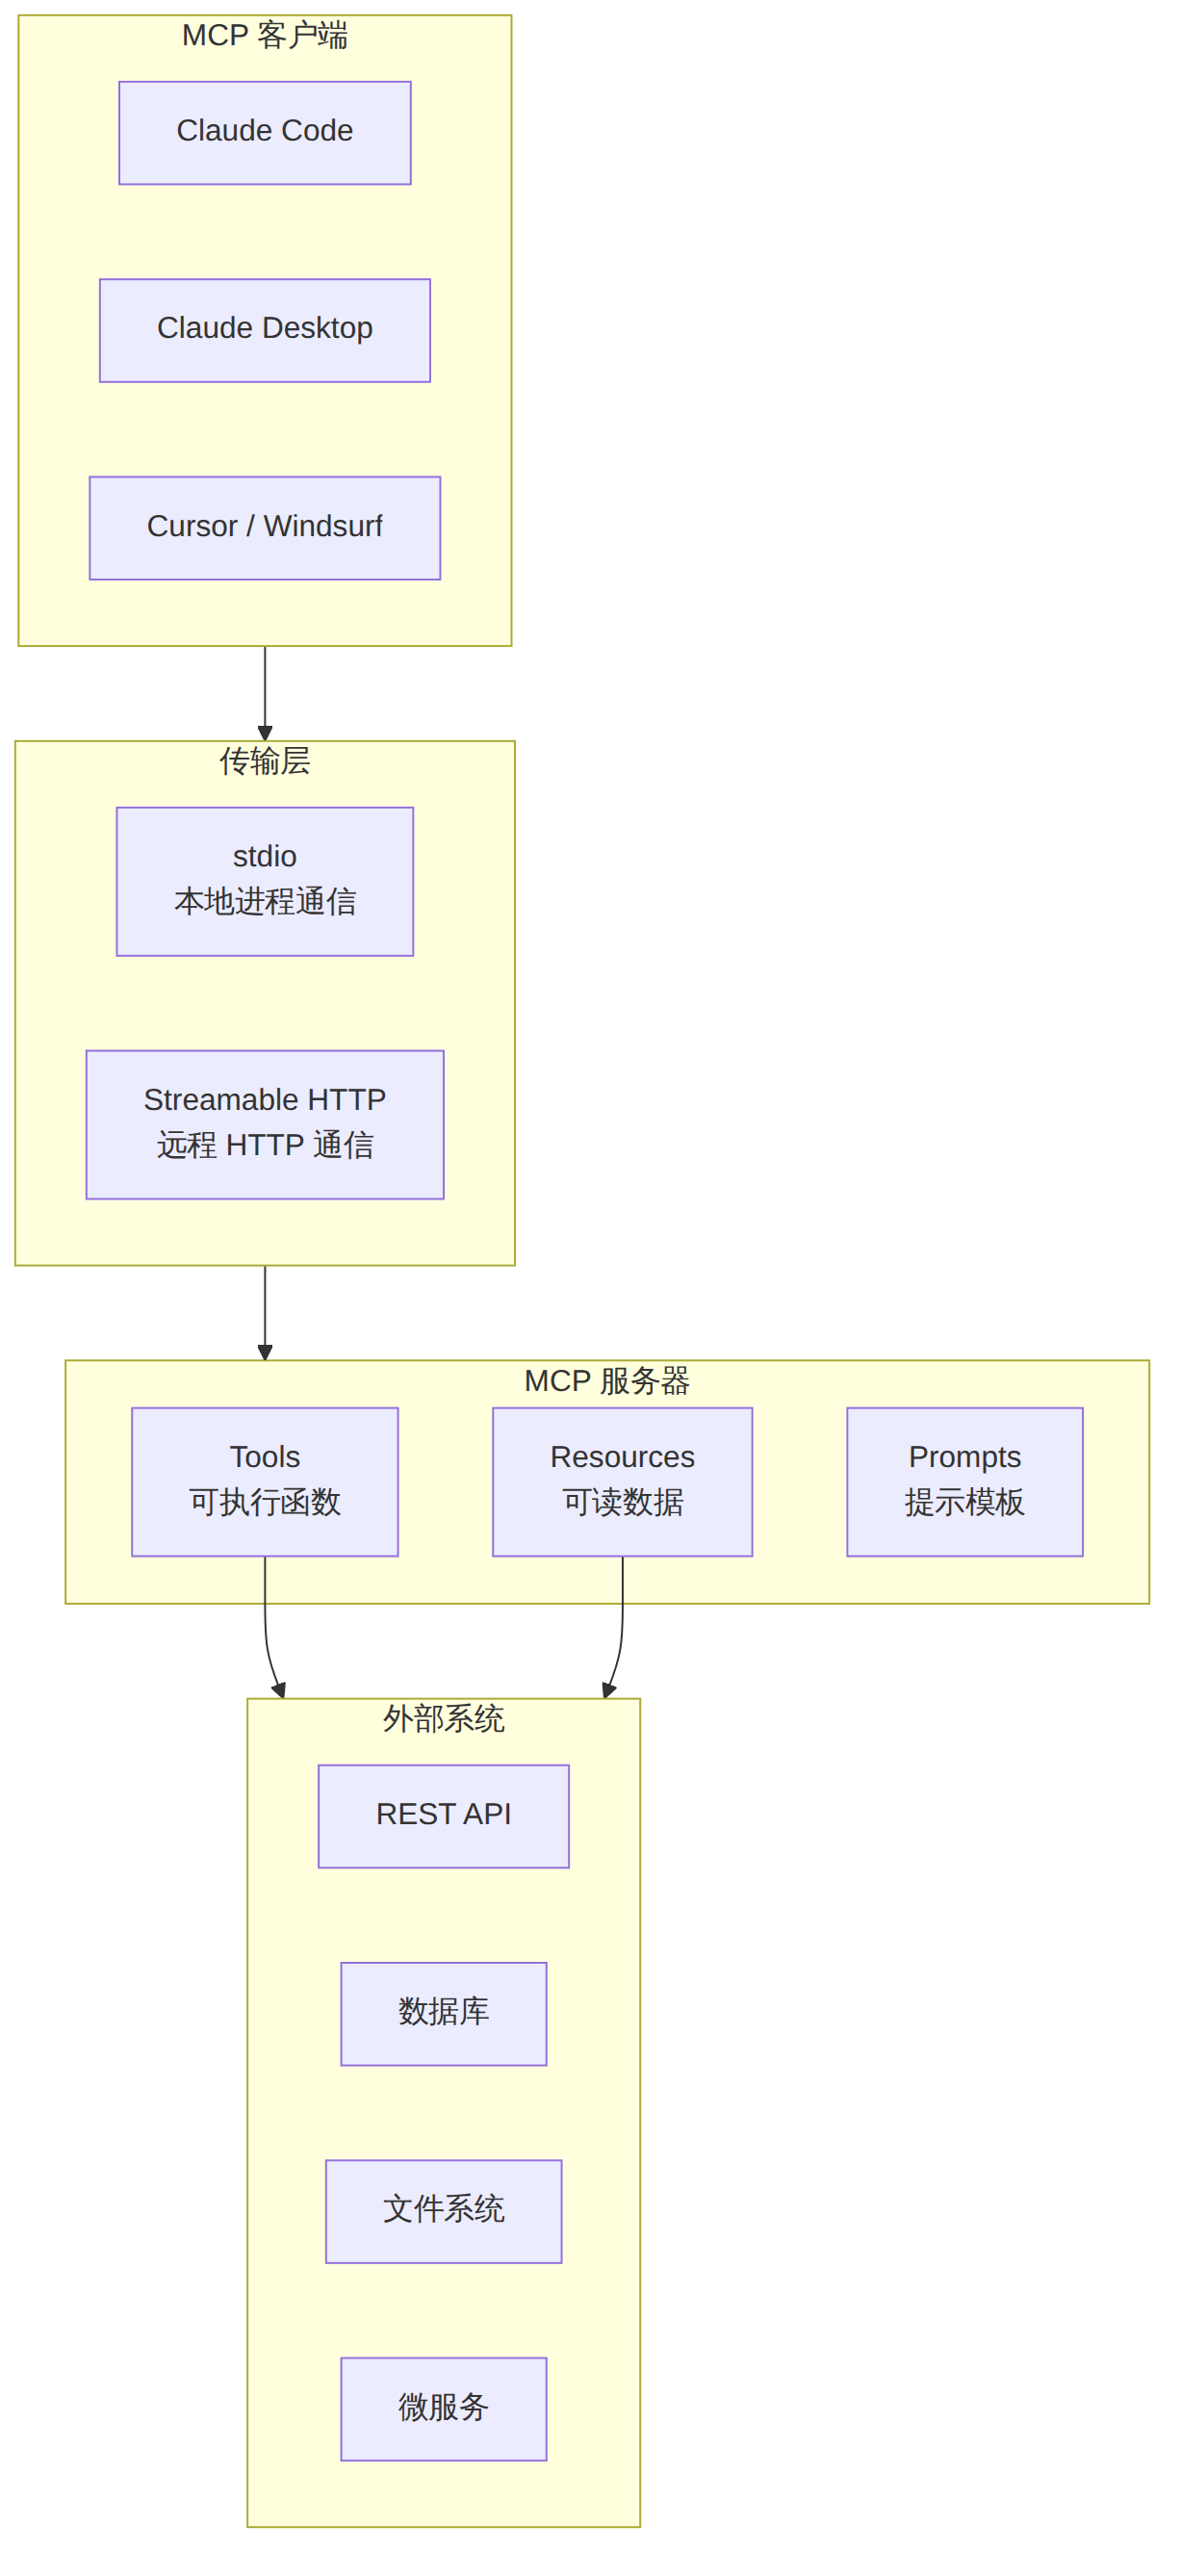
本教程面向希望为 Claude Code 构建自定义 MCP(Model Context Protocol)服务器的开发者。你将学会从零搭建一个完整的 MCP 服务器,包含自定义工具(Tools)、动态资源(Resources)、提示模板(Prompts),掌握 stdio 与 Streamable HTTP 两种传输模式,并通过 MCP Inspector 进行调试,最终将其集成到 Claude Code 工作流中。
适用人群:有 TypeScript/Node.js 基础,希望扩展 Claude Code 能力边界的开发者。
学习目标: - 理解 MCP 协议架构与核心概念 - 使用官方 TypeScript SDK 构建 MCP 服务器 - 实现工具、资源、提示三大核心能力 - 掌握调试、配置、部署的完整流程
| 项目 | 要求 |
|---|---|
| Node.js | v18+ (推荐 v20 LTS) |
| 包管理器 | npm / pnpm / bun |
| Claude Code | 已安装并配置 |
| 基础知识 | TypeScript、REST API、JSON Schema |
Model Context Protocol(MCP)是 Anthropic 发起的开放协议,标准化了 AI 模型与外部工具、数据源之间的通信方式。截至 2026 年,MCP SDK 月下载量已超过 9700 万次,公共服务器超过 10000 个,已成为 AI 工具集成的行业标准。
MCP 的核心理念是将 AI 客户端与工具提供方解耦——你只需编写一次服务器代码,即可被 Claude Code、Claude Desktop、Cursor、Windsurf 等所有支持 MCP 的客户端使用。
图表 1
MCP 客户端与服务器之间通过 JSON-RPC 2.0 协议通信,支持两种传输模式:
| 传输模式 | 适用场景 | 特点 |
|---|---|---|
| stdio | 本地开发、Claude Code 集成 | 通过标准输入/输出通信,零网络依赖 |
| Streamable HTTP | 远程部署、多用户共享 | HTTP 长连接,支持 OAuth 认证 |
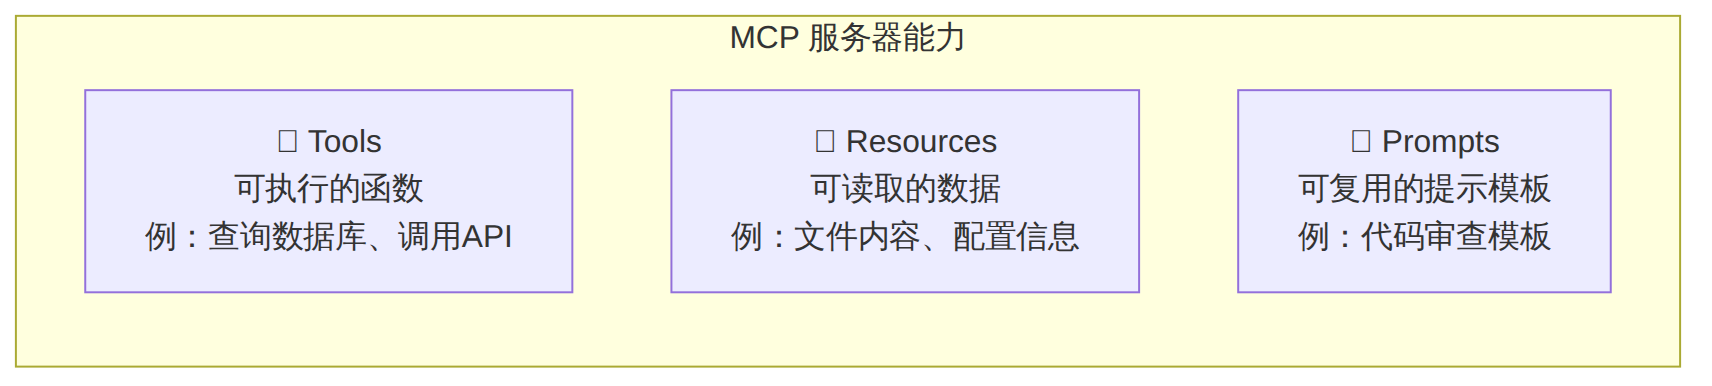
图表 2
# 创建项目目录
mkdir my-mcp-server && cd my-mcp-server

# 初始化 TypeScript 项目
npm init -y
npm install @modelcontextprotocol/sdk zod
npm install -D typescript @types/node tsx

# 初始化 TypeScript 配置
npx tsc --init
编辑 tsconfig.json,确保以下配置:
{
  "compilerOptions": {
    "target": "ES2022",
    "module": "Node16",
    "moduleResolution": "Node16",
    "outDir": "./dist",
    "rootDir": "./src",
    "strict": true,
    "esModuleInterop": true,
    "skipLibCheck": true
  },
  "include": ["src/**/*"]
}
创建 src/index.ts:
import { McpServer } from "@modelcontextprotocol/sdk/server/mcp.js";
import { StdioServerTransport } from "@modelcontextprotocol/sdk/server/stdio.js";
import { z } from "zod";

// 1. 创建服务器实例
const server = new McpServer({
  name: "my-first-server",
  version: "1.0.0",
});

// 2. 注册一个工具
server.tool(
  "greet",                          // 工具名称
  "向用户发送问候语",                 // 工具描述(AI 根据此描述决定是否调用)
  { name: z.string().describe("被问候的人的名字") },  // Zod schema 定义输入参数
  async ({ name }) => {
    return {
      content: [
        { type: "text", text: `你好,${name}!欢迎使用 MCP 服务器。` }
      ]
    };
  }
);

// 3. 启动服务器
async function main() {
  const transport = new StdioServerTransport();
  await server.connect(transport);
  console.error("MCP 服务器已启动"); // 注意:使用 stderr,stdout 留给 JSON-RPC
}

main().catch(console.error);
McpServer 类是 TypeScript SDK 提供的高级 API,它封装了底层 JSON-RPC 通信:
// server.tool() 方法签名
server.tool(
  name: string,           // 工具名称(唯一标识)
  description: string,    // 工具描述(AI 理解用途的关键)
  schema: ZodObject,      // 输入参数 schema(Zod 格式)
  handler: async (params) => {
    return {
      content: [
        { type: "text", text: "..." },     // 文本内容
        { type: "image", data: "...", mimeType: "image/png" },  // 图片
        { type: "resource", resource: { uri: "...", text: "..." } },  // 资源引用
      ]
    };
  }
);
常见陷阱:永远不要用
console.log()输出调试信息。stdio 模式下,stdout被 JSON-RPC 占用,任何额外的console.log都会导致协议错误。使用console.error()输出日志到 stderr。
{
  "name": "my-mcp-server",
  "version": "1.0.0",
  "type": "module",
  "scripts": {
    "dev": "tsx src/index.ts",
    "build": "tsc",
    "start": "node dist/index.js"
  },
  "bin": {
    "my-mcp-server": "./dist/index.js"
  }
}
在 src/index.ts 顶部添加 shebang:
#!/usr/bin/env node
# 直接运行(开发模式)
npx tsx src/index.ts

# 构建后运行
npm run build && node dist/index.js
此时服务器启动后等待 stdin 的 JSON-RPC 消息,不会输出任何内容到终端——这是正常的。
我们来构建一个实际的天气查询 MCP 服务器。
创建 src/weather-server.ts:
#!/usr/bin/env node
import { McpServer } from "@modelcontextprotocol/sdk/server/mcp.js";
import { StdioServerTransport } from "@modelcontextprotocol/sdk/server/stdio.js";
import { z } from "zod";

const server = new McpServer({
  name: "weather-server",
  version: "1.0.0",
  description: "提供全球天气查询服务",
});

// 工具1:查询当前天气
server.tool(
  "get_current_weather",
  "获取指定城市的当前天气信息,包括温度、湿度、风速等",
  {
    city: z.string().describe("城市名称,如 'Beijing'、'Tokyo'"),
    units: z.enum(["metric", "imperial"]).optional().default("metric")
      .describe("温度单位:metric(摄氏) 或 imperial(华氏)"),
  },
  async ({ city, units }) => {
    try {
      // 这里替换为实际的 API 调用
      const weatherData = await fetchWeather(city, units);
      return {
        content: [
          {
            type: "text",
            text: formatWeatherReport(weatherData),
          }
        ]
      };
    } catch (error) {
      return {
        content: [
          {
            type: "text",
            text: `查询失败:${error instanceof Error ? error.message : "未知错误"}`,
          }
        ],
        isError: true,
      };
    }
  }
);

// 工具2:查询天气预报
server.tool(
  "get_weather_forecast",
  "获取未来几天的天气预报",
  {
    city: z.string().describe("城市名称"),
    days: z.number().min(1).max(7).default(3)
      .describe("预报天数,1-7天"),
  },
  async ({ city, days }) => {
    const forecast = await fetchForecast(city, days);
    return {
      content: [
        {
          type: "text",
          text: formatForecastReport(forecast),
        }
      ]
    };
  }
);

// 工具3:比较多个城市天气
server.tool(
  "compare_weather",
  "比较多个城市的天气状况",
  {
    cities: z.array(z.string()).min(2).max(5)
      .describe("要比较的城市列表,2-5个城市"),
  },
  async ({ cities }) => {
    const results = await Promise.all(
      cities.map(async (city) => {
        const data = await fetchWeather(city, "metric");
        return { city, ...data };
      })
    );
    return {
      content: [
        { type: "text", text: formatComparison(results) }
      ]
    };
  }
);

// 辅助函数
async function fetchWeather(city: string, units: string) {
  // 模拟 API 调用——实际项目中替换为真实 API
  return {
    city,
    temperature: 22,
    humidity: 65,
    windSpeed: 12,
    condition: "晴朗",
    units,
  };
}

async function fetchForecast(city: string, days: number) {
  return Array.from({ length: days }, (_, i) => ({
    day: i + 1,
    high: 25 + Math.random() * 5,
    low: 15 + Math.random() * 5,
    condition: ["晴", "多云", "小雨"][Math.floor(Math.random() * 3)],
  }));
}

function formatWeatherReport(data: any): string {
  return `🏙️ ${data.city} 当前天气
━━━━━━━━━━━━━━━━━
🌡️ 温度:${data.temperature}°${data.units === "metric" ? "C" : "F"}
💧 湿度:${data.humidity}%
🌬️ 风速:${data.windSpeed} km/h
☀️ 状况:${data.condition}`;
}

function formatForecastReport(forecast: any[]): string {
  const lines = forecast.map((d) =>
    `第${d.day}天:${d.condition},${d.low.toFixed(1)}°C ~ ${d.high.toFixed(1)}°C`
  );
  return `📋 天气预报\n${lines.join("\n")}`;
}

function formatComparison(results: any[]): string {
  const lines = results.map((r) =>
    `${r.city}: ${r.temperature}°C, ${r.condition}`
  );
  return `📊 城市天气对比\n${lines.join("\n")}`;
}

async function main() {
  const transport = new StdioServerTransport();
  await server.connect(transport);
  console.error("Weather MCP Server 已启动");
}

main().catch(console.error);
Zod 是 MCP 工具参数校验的标准方案,SDK 自动将其转换为 JSON Schema 供 AI 理解:
import { z } from "zod";

// 基本类型
const basicSchema = {
  name: z.string().min(1).max(100).describe("名称"),
  age: z.number().int().positive().describe("年龄"),
  active: z.boolean().describe("是否激活"),
};

// 可选与默认值
const optionalSchema = {
  query: z.string().describe("搜索关键词"),
  limit: z.number().default(10).describe("返回数量上限"),
  sort: z.enum(["asc", "desc"]).optional().describe("排序方向"),
};

// 嵌套对象
const nestedSchema = {
  filter: z.object({
    status: z.enum(["active", "inactive", "pending"]),
    dateRange: z.object({
      start: z.string().describe("ISO 8601 日期"),
      end: z.string().describe("ISO 8601 日期"),
    }).optional(),
  }).describe("筛选条件"),
};

// 数组
const arraySchema = {
  tags: z.array(z.string()).min(1).max(10).describe("标签列表"),
  ids: z.array(z.number()).describe("ID 列表"),
};

// 联合类型
const unionSchema = {
  target: z.union([
    z.string().describe("按名称"),
    z.number().describe("按 ID"),
  ]).describe("搜索目标"),
};
最佳实践:每个字段都必须添加
.describe(),AI 依赖这些描述来正确填写参数。描述越清晰,AI 调用越准确。
server.tool(
  "risky_operation",
  "一个可能失败的操作",
  { input: z.string() },
  async ({ input }) => {
    // 模式1:返回错误信息(不中断会话)
    if (!input.trim()) {
      return {
        content: [{ type: "text", text: "输入不能为空" }],
        isError: true,  // 标记为错误结果
      };
    }

    try {
      const result = await performOperation(input);
      return {
        content: [{ type: "text", text: JSON.stringify(result, null, 2) }],
      };
    } catch (error) {
      // 模式2:捕获异常返回友好错误
      return {
        content: [{
          type: "text",
          text: `操作失败:${error instanceof Error ? error.message : "未知错误"}`,
        }],
        isError: true,
      };
    }
    // 注意:不要让异常传播到外层,否则可能导致服务器崩溃
  }
);
资源是 MCP 服务器暴露给 AI 的可读数据:
// 注册静态资源
server.resource(
  "config",                              // 资源名称
  "config://app-settings",               // 资源 URI
  { description: "应用程序配置" },        // 元数据
  async (uri) => ({
    contents: [
      {
        uri: uri.href,
        mimeType: "application/json",
        text: JSON.stringify({
          appName: "My App",
          version: "2.0",
          features: ["auth", "analytics", "notifications"],
        }, null, 2),
      }
    ]
  })
);
资源模板使用 RFC 6570 URI 模板语法,支持参数化查询:
import { z } from "zod";

// 动态资源模板:按 ID 查询用户
server.resource(
  "user-profile",
  new ResourceTemplate("users://{userId}/profile", { list: undefined }),
  {
    description: "获取用户档案信息",
    mimeType: "application/json",
  },
  async (uri, { userId }) => {
    const user = await db.findUser(userId);
    return {
      contents: [
        {
          uri: uri.href,
          mimeType: "application/json",
          text: JSON.stringify(user, null, 2),
        }
      ]
    };
  }
);

// 动态资源模板:支持列表枚举
server.resource(
  "api-docs",
  new ResourceTemplate("docs://{endpoint}", {
    list: async () => ({
      resources: [
        { uri: "docs:///users", name: "Users API" },
        { uri: "docs:///orders", name: "Orders API" },
        { uri: "docs:///products", name: "Products API" },
      ]
    })
  }),
  {
    description: "API 文档",
    mimeType: "text/markdown",
  },
  async (uri, { endpoint }) => {
    const doc = await loadApiDoc(endpoint);
    return {
      contents: [{ uri: uri.href, mimeType: "text/markdown", text: doc }]
    };
  }
);
提示模板让 AI 在特定场景下遵循预设的格式和步骤:
// 基本提示模板
server.prompt(
  "code-review",
  "代码审查提示模板:结构化地审查代码变更",
  {
    language: z.string().describe("编程语言"),
    code: z.string().describe("待审查的代码"),
    focus: z.enum(["security", "performance", "readability", "all"])
      .default("all")
      .describe("审查重点"),
  },
  async ({ language, code, focus }) => {
    return {
      messages: [
        {
          role: "user",
          content: {
            type: "text",
            text: `请对以下 ${language} 代码进行${focus === "all" ? "全面" : focus + "方面"}审查:

\`\`\`${language}
${code}
\`\`\`

请从以下维度分析:
1. 代码质量与可读性
2. 潜在的安全漏洞
3. 性能优化建议
4. 最佳实践建议

请给出具体的改进建议和修改后的代码示例。`,
          }
        }
      ]
    };
  }
);
Elicitation 是 MCP 2025-06 规范引入的关键能力,允许服务器在执行过程中请求用户输入,实现人在回路(Human-in-the-Loop)工作流:
import { ElicitationRequest } from "@modelcontextprotocol/sdk/types.js";

server.tool(
  "deploy_service",
  "部署服务到指定环境",
  {
    serviceName: z.string().describe("服务名称"),
    environment: z.enum(["staging", "production"]).describe("目标环境"),
  },
  async ({ serviceName, environment }, extra) => {
    // 如果目标是生产环境,请求人工确认
    if (environment === "production") {
      const confirmation = await extra.elicitInput?.({
        message: `确认要将 "${serviceName}" 部署到生产环境吗?`,
        requestedFields: {
          confirm: {
            type: "boolean",
            description: "确认部署操作",
            default: false,
          },
          reason: {
            type: "string",
            description: "部署原因(必填)",
          }
        }
      });

      if (!confirmation?.confirm) {
        return {
          content: [{ type: "text", text: "部署已取消" }],
          isError: true,
        };
      }
    }

    // 执行部署...
    return {
      content: [{ type: "text", text: `${serviceName} 已部署到 ${environment}` }]
    };
  }
);
长时间运行的工具可以通过进度通知向客户端报告进度:
server.tool(
  "bulk_process",
  "批量处理数据文件",
  {
    fileCount: z.number().describe("文件数量"),
  },
  async ({ fileCount }, extra) => {
    const results = [];
    for (let i = 0; i < fileCount; i++) {
      // 处理单个文件
      results.push(await processFile(i));

      // 发送进度通知
      await extra.sendProgress?.({
        progress: i + 1,
        total: fileCount,
      });
    }

    return {
      content: [
        { type: "text", text: `已处理 ${fileCount} 个文件` }
      ]
    };
  }
);
MCP Inspector 是官方提供的可视化调试工具:
# 方法1:npx 直接运行
npx @modelcontextprotocol/inspector npx tsx src/index.ts

# 方法2:指定完整命令
npx @modelcontextprotocol/inspector node dist/index.js

# 方法3:带环境变量
npx @modelcontextprotocol/inspector \
  -e API_KEY=your_key \
  node dist/index.js
Inspector 启动后会打开浏览器界面,你可以:
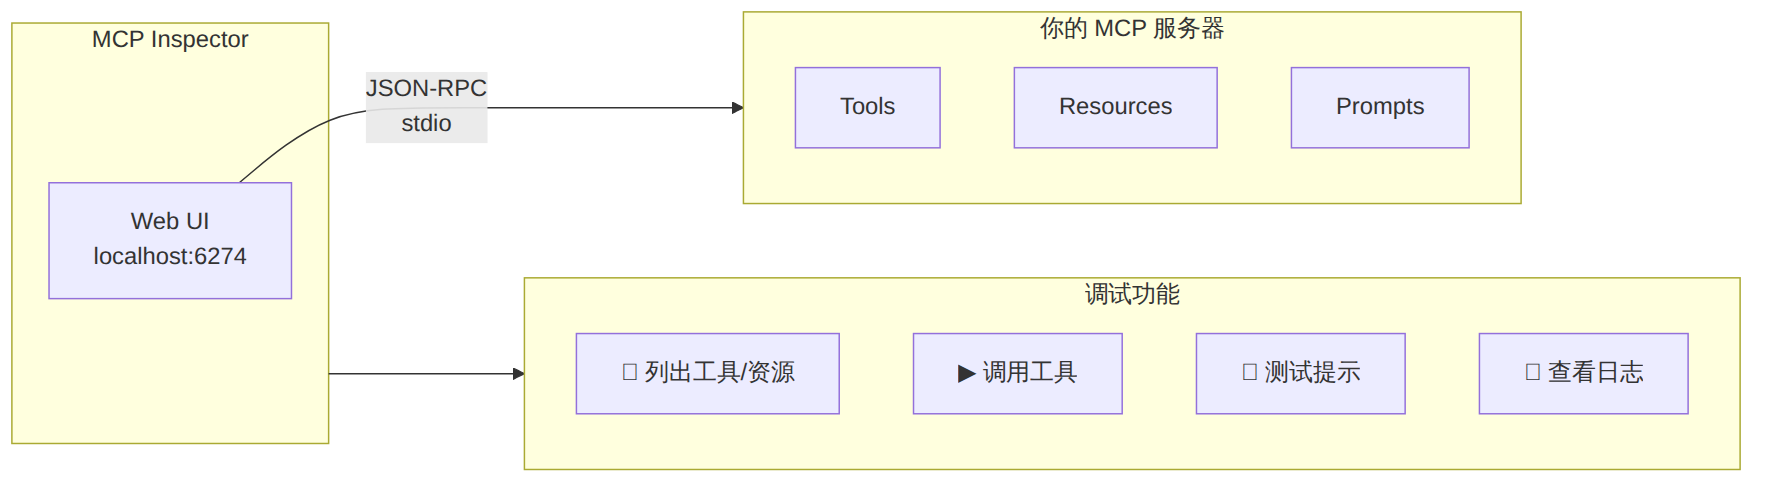
图表 3
不使用 Inspector 时,可以通过管道手动发送 JSON-RPC 消息:
# 发送 initialize 请求
echo '{"jsonrpc":"2.0","id":1,"method":"initialize","params":{"protocolVersion":"2025-06-18","capabilities":{},"clientInfo":{"name":"test","version":"1.0"}}}' | npx tsx src/index.ts

# 发送 tools/list 请求
echo '{"jsonrpc":"2.0","id":2,"method":"tools/list"}' | npx tsx src/index.ts

# 调用工具
echo '{"jsonrpc":"2.0","id":3,"method":"tools/call","params":{"name":"greet","arguments":{"name":"World"}}}' | npx tsx src/index.ts
| 问题 | 原因 | 解决方案 |
|---|---|---|
| 服务器无法启动 | TypeScript 编译错误 | 先 npx tsc --noEmit 检查类型 |
| 工具列表为空 | 未注册工具或注册失败 | 检查 server.tool() 调用 |
| 连接超时 | 使用了 console.log |
替换为 console.error |
| 参数验证失败 | Zod schema 不匹配 | 使用 Inspector 检查 schema |
| 中文乱码 | 编码问题 | 确保文件为 UTF-8 |
Claude Code 提供了 claude mcp 命令来管理 MCP 服务器:
# 添加本地 MCP 服务器(stdio 模式)
claude mcp add my-server -- npx tsx /path/to/src/index.ts

# 添加构建后的服务器
claude mcp add my-server -- node /path/to/dist/index.js

# 添加带环境变量的服务器
claude mcp add my-server -e API_KEY=xxx -e DEBUG=true -- node dist/index.js

# 添加远程 MCP 服务器(HTTP 模式)
claude mcp add --transport http http://localhost:3000/mcp

# 指定作用域
claude mcp add my-server -s user -- node dist/index.js       # 用户级(全局)
claude mcp add my-server -s project -- node dist/index.js    # 项目级(.mcp.json)
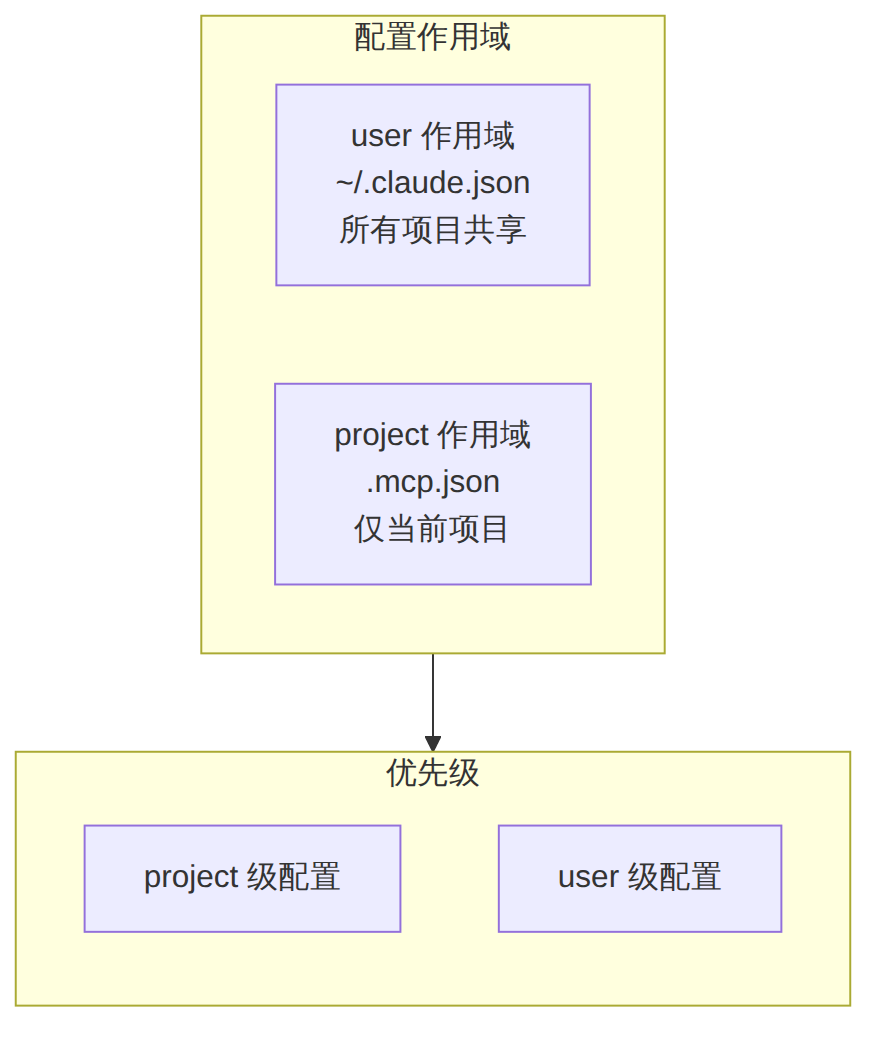
图表 4
用户级配置(~/.claude.json):
{
  "mcpServers": {
    "weather-server": {
      "command": "node",
      "args": ["/path/to/weather-server/dist/index.js"],
      "env": { "WEATHER_API_KEY": "xxx" }
    }
  }
}
项目级配置(.mcp.json,可提交到 Git):
{
  "mcpServers": {
    "project-tools": {
      "command": "npx",
      "args": ["tsx", "mcp/index.ts"],
      "env": {}
    }
  }
}
# 列出所有已配置的服务器
claude mcp list

# 查看特定服务器详情
claude mcp get my-server

# 移除服务器
claude mcp remove my-server

# 重置所有服务器配置
claude mcp reset

# 在 Claude Code 内部查看 MCP 状态
# 输入 /mcp 命令查看所有服务器连接状态
服务器添加成功后,Claude Code 会自动发现所有工具、资源和提示。你只需用自然语言描述需求:
# 假设你添加了天气服务器
> 查一下北京的天气
# Claude 会自动调用 get_current_weather 工具

> 比较北京、上海和广州的天气
# Claude 会调用 compare_weather 工具

> 看看未来3天东京的天气预报
# Claude 会调用 get_weather_forecast 工具
让我们构建一个实用的 MCP 服务器,为 Claude Code 提供深度 Git 仓库分析能力。
创建 src/git-analyzer.ts:
#!/usr/bin/env node
import { McpServer } from "@modelcontextprotocol/sdk/server/mcp.js";
import { StdioServerTransport } from "@modelcontextprotocol/sdk/server/stdio.js";
import { execSync } from "child_process";
import { z } from "zod";

const server = new McpServer({
  name: "git-analyzer",
  version: "1.0.0",
});

// ========== 工具 ==========

// 工具1:代码热力图分析
server.tool(
  "hotspot_analysis",
  "分析 Git 仓库中变更最频繁的文件(代码热力图)",
  {
    repoPath: z.string().describe("仓库绝对路径"),
    topN: z.number().default(20).describe("返回前 N 个热点文件"),
    since: z.string().optional().describe("起始日期,如 '2024-01-01'"),
  },
  async ({ repoPath, topN, since }) => {
    const sinceArg = since ? ` --since="${since}"` : "";
    const cmd = `cd ${repoPath} && git log --pretty=format: --name-only${sinceArg} | sort | uniq -c | sort -rg | head -${topN}`;

    try {
      const result = execSync(cmd, { encoding: "utf-8", maxBuffer: 10 * 1024 * 1024 });
      return {
        content: [{
          type: "text",
          text: `🔥 代码热力图(变更频率最高的文件)\n\n${result}`,
        }]
      };
    } catch (error) {
      return {
        content: [{ type: "text", text: `分析失败:${(error as Error).message}` }],
        isError: true,
      };
    }
  }
);

// 工具2:贡献者分析
server.tool(
  "contributor_stats",
  "分析仓库贡献者统计信息",
  {
    repoPath: z.string().describe("仓库绝对路径"),
    groupBy: z.enum(["commits", "lines", "files"]).default("commits")
      .describe("统计维度"),
  },
  async ({ repoPath, groupBy }) => {
    let cmd: string;

    switch (groupBy) {
      case "commits":
        cmd = `cd ${repoPath} && git shortlog -sn --all`;
        break;
      case "lines":
        cmd = `cd ${repoPath} && git log --format='%aN' | sort -u | while read name; do echo "$(git log --author="$name" --pretty=tformat: --numstat | awk '{add+=$1; del+=$2} END {print add+del}') $name"; done | sort -rn`;
        break;
      case "files":
        cmd = `cd ${repoPath} && git log --format='%aN' | sort -u | while read name; do echo "$(git log --author="$name" --pretty=tformat: --name-only | sort -u | wc -l) $name"; done | sort -rn`;
        break;
    }

    const result = execSync(cmd, { encoding: "utf-8", maxBuffer: 10 * 1024 * 1024 });
    return {
      content: [{
        type: "text",
        text: `📊 贡献者分析(按${groupBy}排序)\n\n${result}`,
      }]
    };
  }
);

// 工具3:分支健康度检查
server.tool(
  "branch_health",
  "分析分支的健康状况,检测过期分支和合并冲突风险",
  {
    repoPath: z.string().describe("仓库绝对路径"),
    staleDays: z.number().default(30).describe("超过多少天视为过期分支"),
  },
  async ({ repoPath, staleDays }) => {
    // 获取所有分支及最后提交日期
    const branches = execSync(
      `cd ${repoPath} && git for-each-ref --sort=-committerdate --format='%(refname:short)|%(committerdate:iso8601)|%(authorname)' refs/remotes/origin/`,
      { encoding: "utf-8" }
    ).trim().split("\n");

    const now = new Date();
    const staleThreshold = staleDays * 24 * 60 * 60 * 1000;

    const analysis = branches.map((line) => {
      const [name, dateStr, author] = line.split("|");
      const lastCommit = new Date(dateStr);
      const daysSince = Math.floor((now.getTime() - lastCommit.getTime()) / (24 * 60 * 60 * 1000));
      const isStale = daysSince > staleDays;

      return {
        name,
        lastCommit: dateStr,
        author,
        daysSince,
        status: isStale ? "⚠️ 过期" : "✅ 活跃",
      };
    });

    const active = analysis.filter((b) => b.status.includes("✅"));
    const stale = analysis.filter((b) => b.status.includes("⚠️"));

    return {
      content: [{
        type: "text",
        text: `🌿 分支健康度报告
━━━━━━━━━━━━━━━━━
活跃分支:${active.length} 个
过期分支(>${staleDays}天):${stale.length} 个

过期分支列表:
${stale.map((b) => `  ${b.status} ${b.name} (${b.daysSince}天前, by ${b.author})`).join("\n")}
`,
      }]
    };
  }
);

// ========== 资源 ==========

server.resource(
  "recent-commits",
  "git://recent-commits",
  { description: "最近 20 条提交记录" },
  async (uri) => {
    const log = execSync(
      "git log --oneline -20 --decorate --graph",
      { encoding: "utf-8" }
    );
    return {
      contents: [{ uri: uri.href, mimeType: "text/plain", text: log }]
    };
  }
);

// ========== 提示 ==========

server.prompt(
  "pr-review-checklist",
  "生成基于仓库状态的 PR 审查清单",
  {
    prTitle: z.string().describe("PR 标题"),
    changedFiles: z.string().describe("变更文件列表(逗号分隔)"),
  },
  async ({ prTitle, changedFiles }) => {
    const files = changedFiles.split(",").map((f) => f.trim());
    return {
      messages: [
        {
          role: "user",
          content: {
            type: "text",
            text: `请为以下 PR 生成审查清单:

标题:${prTitle}
变更文件:${files.join(", ")}

请基于以下方面生成清单:
1. 代码逻辑正确性
2. 测试覆盖率
3. 安全性考虑
4. 性能影响
5. 文档更新需求

对每个变更文件给出具体的审查要点。`,
          }
        }
      ]
    };
  }
);

// ========== 启动 ==========

async function main() {
  const transport = new StdioServerTransport();
  await server.connect(transport);
  console.error("Git Analyzer MCP Server 已启动");
}

main().catch(console.error);
添加到 Claude Code:
# 构建项目
npx tsc

# 添加到 Claude Code(项目级)
claude mcp add git-analyzer -s project -- node /absolute/path/to/git-analyzer/dist/git-analyzer.js
使用示例:
> 分析一下这个仓库的代码热力图
> 哪些分支已经过期了?
> 生成 PR 审查清单,标题是"feat: add auth module",变更文件是 auth.ts, auth.test.ts, middleware.ts
Streamable HTTP 是 2025-06 规范推荐的远程传输方式,取代了之前的 SSE:
import { McpServer } from "@modelcontextprotocol/sdk/server/mcp.js";
import { StreamableHTTPServerTransport } from "@modelcontextprotocol/sdk/server/streamable-http.js";
import express from "express";

const app = express();
app.use(express.json());

const server = new McpServer({
  name: "remote-weather-server",
  version: "1.0.0",
});

// ... 注册工具、资源、提示(与 stdio 模式完全相同)

// 创建传输层
const transport = new StreamableHTTPServerTransport({
  sessionIdGenerator: undefined, // 无状态模式
});

// 连接服务器与传输层
await server.connect(transport);

// 挂载到 Express
app.use("/mcp", (req, res) => {
  transport.handleRequest(req, res);
});

app.listen(3000, () => {
  console.log("MCP Server running on http://localhost:3000/mcp");
});
# 添加远程 HTTP 服务器
claude mcp add --transport http http://localhost:3000/mcp

# 或带认证头的远程服务器
claude mcp add --transport http https://api.example.com/mcp \
  -e AUTH_TOKEN=your_token
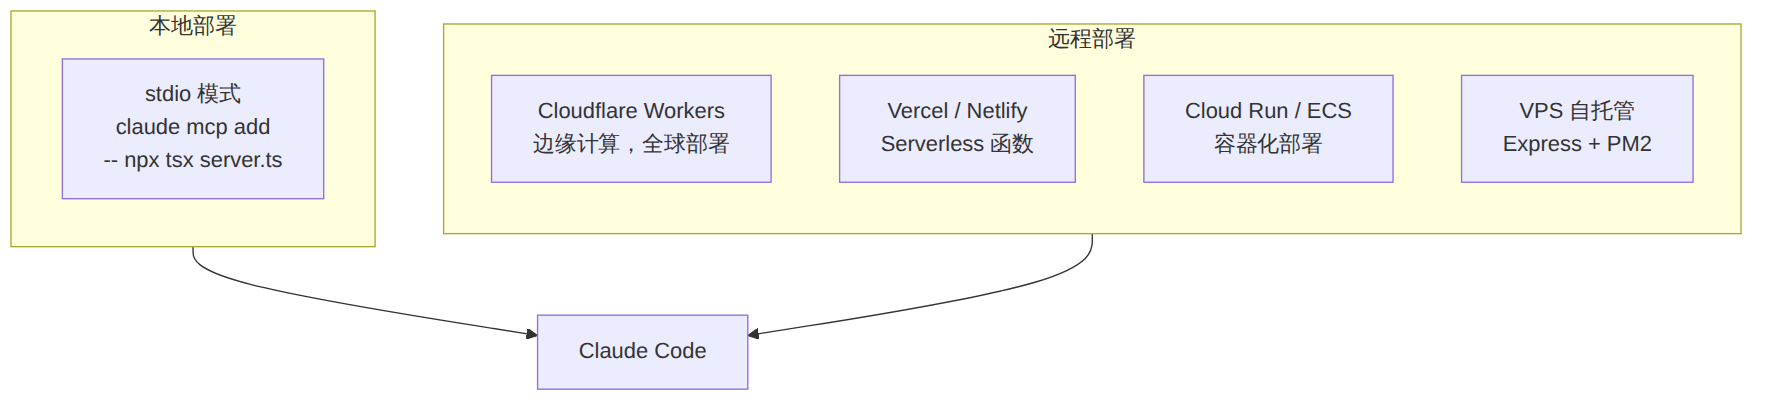
图表 5
| 平台 | 适用场景 | 部署方式 |
|---|---|---|
| Cloudflare Workers | 全球低延迟、无服务器 | npx @anthropic/mcp deploy |
| Vercel | Serverless、与前端同平台 | API Route + adapter |
| Cloud Run | 需要持久化状态 | Docker 容器部署 |
| VPS | 完全控制、私有化 | Express + PM2 + Nginx |

图表 6
my-mcp-server/
├── src/
│   ├── index.ts          # 服务器入口 + 传输层配置
│   ├── tools/            # 工具注册
│   │   ├── query.ts      # 查询类工具
│   │   ├── mutation.ts   # 变更类工具
│   │   └── index.ts      # 工具注册汇总
│   ├── resources/        # 资源定义
│   │   └── index.ts
│   ├── prompts/          # 提示模板
│   │   └── index.ts
│   └── lib/              # 共享逻辑
│       ├── api.ts        # 外部 API 客户端
│       └── utils.ts      # 工具函数
├── dist/                 # 编译输出
├── .mcp.json             # 项目级 MCP 配置(可选)
├── package.json
└── tsconfig.json
// 1. 输入消毒——防止命令注入
server.tool(
  "safe_git_log",
  "安全的 git 日志查询",
  {
    repoPath: z.string().describe("仓库路径"),
    // 不要直接拼接用户输入到 shell 命令中
  },
  async ({ repoPath }) => {
    // ❌ 危险:execSync(`git log ${repoPath}`)
    // ✅ 安全:验证路径合法性
    const resolved = path.resolve(repoPath);
    if (!resolved.startsWith("/allowed/base/path")) {
      return {
        content: [{ type: "text", text: "路径不在允许范围内" }],
        isError: true,
      };
    }
    // 使用 execFile 替代 execSync 避免注入
    // ...
  }
);

// 2. 敏感操作用 Elicitation 确认
// 3. 环境变量存储密钥,不硬编码
// 4. 工具返回数据脱敏
| 维度 | 评估 |
|---|---|
| 适合训练营类型 | AI 工具开发营、Claude Code 高级用户营、企业 AI 集成营 |
| 难度等级 | ⭐⭐⭐ 中高级 |
| 预计教学时长 | 4-6 小时(含动手实验) |
| 实验环境要求 | Node.js 18+、Claude Code、npm |
| 推荐学习路径 | 第三章入门 → 第四章实战 → 第六章调试 → 第七章集成 → 第九章部署 |
| 前置课程 | Claude Code 入门篇(Round 1)、Skills 开发实战(Round 2) |
[!tip] 51学通信知识星球 星主:爱卫生(微信:gprshome201101)——公众号「51学通信」创办者,19 年通信行业运维与讲师经验,著有《GPRS网络信令实例详解》《EPC原理与实践》《5G核心网原理与实践》三本纸质书(各大电商平台有售)。 星球定位:深耕 5G 核心网、IMS、NFV/AI、云原生等 ICT 领域,主打运维岗位与信令分析。 当前规模:5200 篇主题 / 990 个回答,198 元/年。 加入福利:加入星球后请加爱卫生微信,拉您进知识星球年度陪伴与答疑群——不限量回复您的各种问题,另有群内分享。 AI 加持:51学通信知识星球已作为 skill 接入 WorkBuddy,使用 deepseek-4-flash 在海量星球帖子中精准找贴、找视频、找 FAQ 和案例,做总结、找文档和 PPT 等场景全覆盖。